Guide: How to Integrate a KYC API in 1 Day (Step-by-Step for Developers)
Key takeaways (TL; DR)
With Didit you can integrate full identity verification in a matter of hours and launch today.
Start fast with a no-code verification flow and, as your product grows, switch or expand to the API for more flexibility.
The core KYC plan is free and unlimited, so you can scale without adding costs from day one.
The platform is designed to preserve UX while meeting strict compliance requirements.
Integrating a KYC API is often more painful than it should be. All too often, docs skip crucial details, sandbox differs from production, or webhooks fail without explanation. If that sounds familiar, this guide is for you.
With Didit’s KYC API you’ll go from zero to full identity verification in just a few hours. We’re talking about a production-grade flow for document and biometric verification, with 1:1 Face Match and Passive Liveness, plus everything you need to track verification statuses in real time with signed webhooks and a sandbox that behaves like production. If you want to move even faster, you can orchestrate everything with a No-Code verification flow and go live in minutes.
Best part? Didit’s KYC API is completely free. You can verify identities at no cost and without limits, so you can start scaling your platform immediately.
This guide is written by and for developers: the goal is to get a reliable verification flow running—sessions that approve in seconds and clear, predictable states. If you were searching for “how to integrate a KYC API in one day,” you’re in the right place.
What is a KYC integration and why do companies need it?
Integrating a KYC solution lets companies meet identity verification requirements through an identity verification provider. These integrations automate user validation, which is essential for anti-money laundering (AML) compliance.
Typically, KYC integrations are implemented via API (more flexibility) or with a hosted verification URL (more speed). Choosing the right approach depends on your product’s needs.
Why is KYC important for businesses?
- Automates what used to be manual. Compliance teams used to spend hours verifying user-submitted onboarding data; now it can be done securely in seconds.
- Meets KYC regulations. Rules evolve to fight increasingly sophisticated fraud. A KYC API helps ensure compliance so every verification is current and by the book.
- Better fraud protection. A KYC API removes manual steps and human error. A fraud-detection layer blocks synthetic identities, deepfakes, and altered or AI-generated documents.
- Operational efficiency. With less manual work, compliance teams can focus on what matters: real-time risk review and spotting suspicious patterns.
- Unlimited scalability. Manual reviews create bottlenecks. Automated onboarding removes them, letting users in within seconds without sacrificing security or accuracy.
- Significant savings. KYC integration reduces time, resources, and costs. With Didit, savings can reach up to 70% versus legacy vendors.
How to integrate Didit’s KYC API (and ship to production today)
The standard Didit integration relies on a Didit-hosted workflow, one verification session per user, a verification URL to run the flow, and signed webhooks to sync real-time status. The minimal loop is: create the session with your workflow_id, send the user to the verification url, receive the webhook with the decision, and, if needed, fetch the result via API. Thanks to Didit’s modularity, you can add layers like AML Screening, Proof of Address, or Age Estimation without re-architecting.
Check the full documentation (API Full Flow) if you need more detail.
Before you start: API Key, Webhook Secret, and Webhook configuration
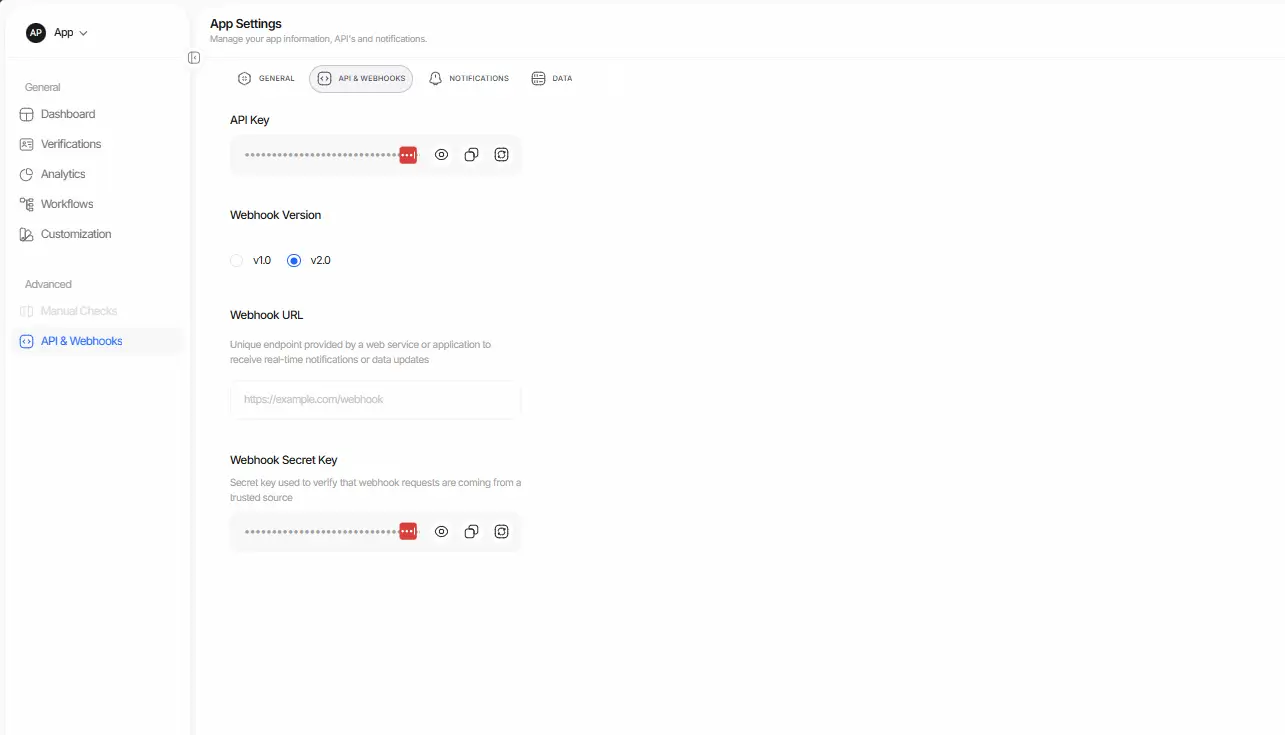
Log in to the Business Console (free signup) and go to API & Webhooks in the left sidebar. Grab your API Key (to authenticate via the X-Api-Key header) and your Webhook Secret Key (to verify webhook signatures).
In the same panel, set the Webhook URL that Didit will use to notify status changes.
Store these values as environment variables (.env); they should look like this:
API_KEY=<YourApiKey>
WEBHOOK_SECRET_KEY=<YourWebhookSecretKey>
WEBHOOK_URL=https://yourapp.com/api/webhooks/didit
Create the verification session
Next, call the verification service. This code is an example—replace (workflow_id, callback, API_KEY) with your real values.
POST /v2/session/
Host: verification.didit.me
Content-Type: application/json
X-Api-Key: {YourApiKey}

{
  "workflow_id": "11111111-2222-3333-4444-555555555555",  // Replace with your chosen workflow
  "callback": "<https://example.com/verification/callback>",
  "vendor_data": "user-123",  // Your user identifier
  "metadata": {
    "user_type": "premium",
    "account_id": "ABC123"
  },
  "contact_details": {
    "email": "john.doe@example.com",
    "email_lang": "en",
    "phone": "+14155552671"
  }
}
The response includes (among other fields) the session_id, initial status, and the hosted verification url that you’ll use to send users into the flow:
{
  "session_id": "11111111-2222-3333-4444-555555555555",
  "session_number": 1234,
  "session_token": "abcdef123456",
  "vendor_data": "user-123",
  "metadata": { "user_type": "premium", "account_id": "ABC123" },
  "status": "Not Started",
  "workflow_id": "example_workflow_id",
  "callback": "<https://example.com/verification/callback>",
  "url": "<https://verify.didit.me/session/abcdef123456>"
}
You’ll find more details and additional code samples in the Create Session section of the docs.
Run the verification UI (redirect or embed)
With the verification url, you can redirect the user (simplest) or embed the flow in an <iframe> to keep your layout. Didit orchestrates document capture, selfie, and liveness according to your workflow.
After each step, the session advances its status and a webhook is sent.
Verification session results
Results arrive in two ways: Webhooks (recommended) or on-demand API fetch. With webhooks, your backend receives real-time notifications whenever the session status changes—no polling, one source of truth.
To ensure webhook authenticity, always validate the signature sent in the X-Signature header using your WEBHOOK_SECRET_KEY. Also check the X-Timestamp header and reject requests outside a short window (e.g., 5 minutes) to prevent replay/fraud.
See the Webhooks section in the docs for full details and additional examples.
If you ever need to reconcile states (e.g., a webhook didn’t arrive), you can fetch the decision on demand:
GET <https://verification.didit.me/v2/session/{sessionId}/decision/>
X-Api-Key: <YourApiKey>
Consistently map statuses in your system (for example: Not Started → In Progress → In Review → Approved / Declined / Abandoned) and reflect each transition in your UI and metrics. This avoids ambiguity across product, support, and analytics.
Need more control? Use Didit’s standalone verification APIs
Looking for more flexibility and control? Didit’s standalone APIs make it easy. Beyond the all-in-one KYC API (ID Verification, 1:1 Face Match, Passive Liveness), you can compose your own verification pipelines or add targeted checks—only the features you need, exactly where you need them.
What can you do with Didit’s standalone APIs?
- ID Verification: verify an ID document and extract the key data.
- 1:1 Face Match: compare the document portrait with a live selfie.
- Age Estimation: estimate age for low-friction onboarding in age-restricted products.
- Proof of Address: verify a user’s address based on official documents and utility bills.
- AML Screening: check users against watchlists, sanctions, PEPs, and adverse media.
- 1:N Face Search: detect duplicates by searching a face against a database.
- Passive Liveness: ensure the user is physically present during verification.
- Database Validation: validate an identity against national/global databases (1x1 and 2x2).
- Phone Verification: verify phone numbers with OTP codes.
- Email Verification: verify user emails with OTP codes.
How much does a KYC API cost?
Didit offers the only free and unlimited identity verification plan. That means the cost of using the KYC API is zero, whether you run it once or hundreds of times.
No fine print, no lock-in, no bundles. Didit is a simple, open, flexible, and cost-effective alternative—savings up to 70% versus entrenched vendors. The model is based on optional capabilities (AML Screening, Proof of Address, Phone/Email Verification, etc.) and on the usage of standalone APIs.
Guide: How to Integrate a KYC API in 1 Day (Step-by-Step for Developers)
